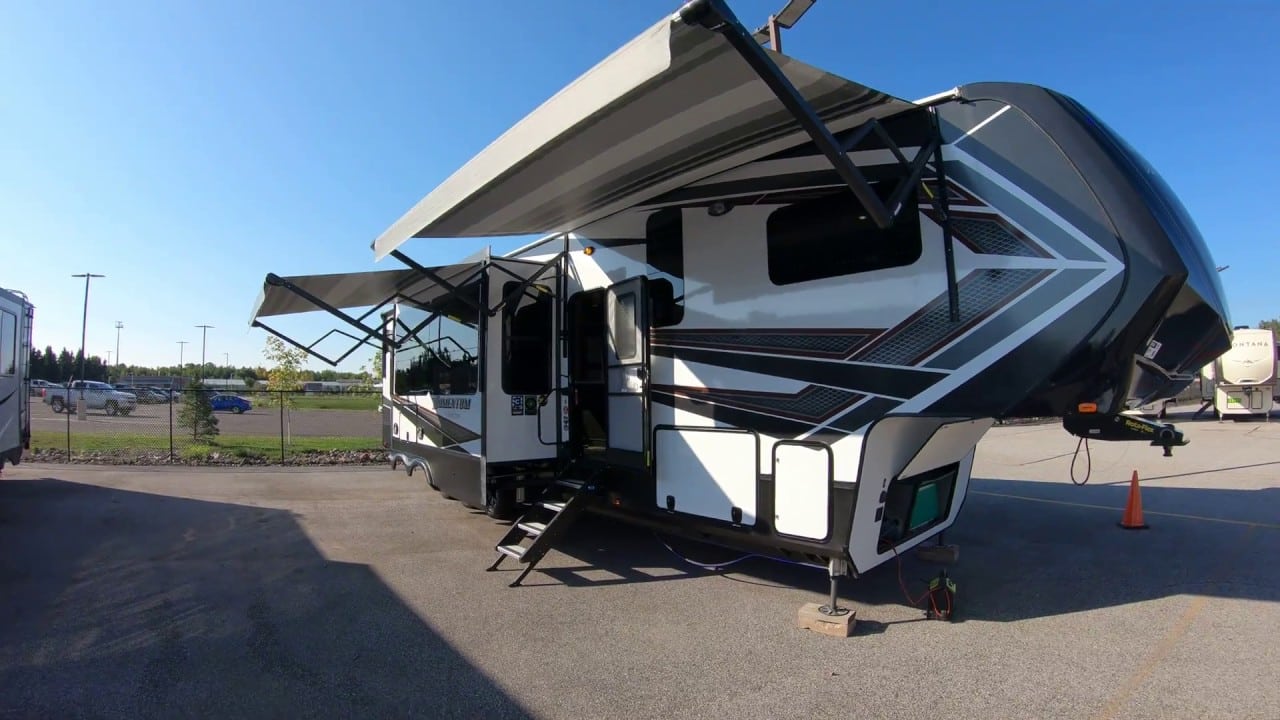
We have all been there, bought something just to learn a few weeks, months or a year later, that what we bought has some major issues we missed. Yep, I’ve been there and done that too even thought I am NRVIA Level II certified, have years of training and experience in inspections and appraisals of all types of vehicles. The biggest culprit is mostly our emotions and the excitement of making it our own. Here are some tips and advice to help you along in your RV or Camper Shopping and Buying experience.
Prepping for the Inspection
- Does the seller or dealer have the proper power source for the RV or Camper to power the entire unit? If not you need to bring a generator or arrange to meet at a campground that you can plug into.
- Be sure to have the seller or dealer make sure there is water onsite and water in the tank.
- Make sure the seller knows you plan on testing the propane system and that there needs to be a tank at least half full.
- Have the seller turn on the refrigerator, fill the hot water heater and turn everything on the night before so it can be proven that its is working.
- You never know the condition of a Camper or RV ladder so bring your own, just make sure it is tall enough to make a hand-hold when it is leaned up on the roof.
- You should also make sure you have a coin or a tire tread depth gauge. This will help you determine which tires are newer or how they are wearing across the board.
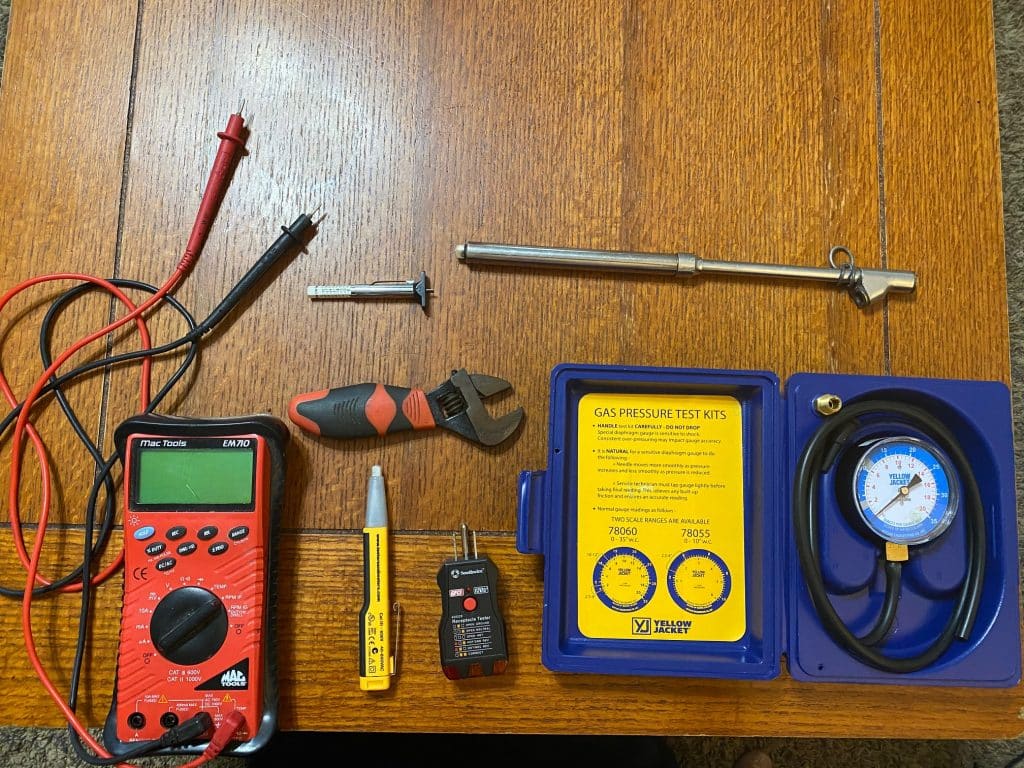
- Bring along a multi-meter or cheap voltmeter so you can test the electronics!
- Get one of those pencil looking electrical testers. They are $10 and work great for a quick test.
- Something to lay on or something to kneel down onto. It will save your knees from rocks and keep you from getting as dirty when you check the plumbing underneath.
- Bring a CD and DVD so you can test the electronics inside! A lot of folks buy a used RV or Camper just to later on end up having to replace and upgrade the entertainment system because the speakers don’t work or the system won’t play a DVD.
- This may sound silly but bring along a coffee mug and a bottle of water. You will use this later on to test the microwave.
Check for the Obvious – Any Damage You Can See Quickly
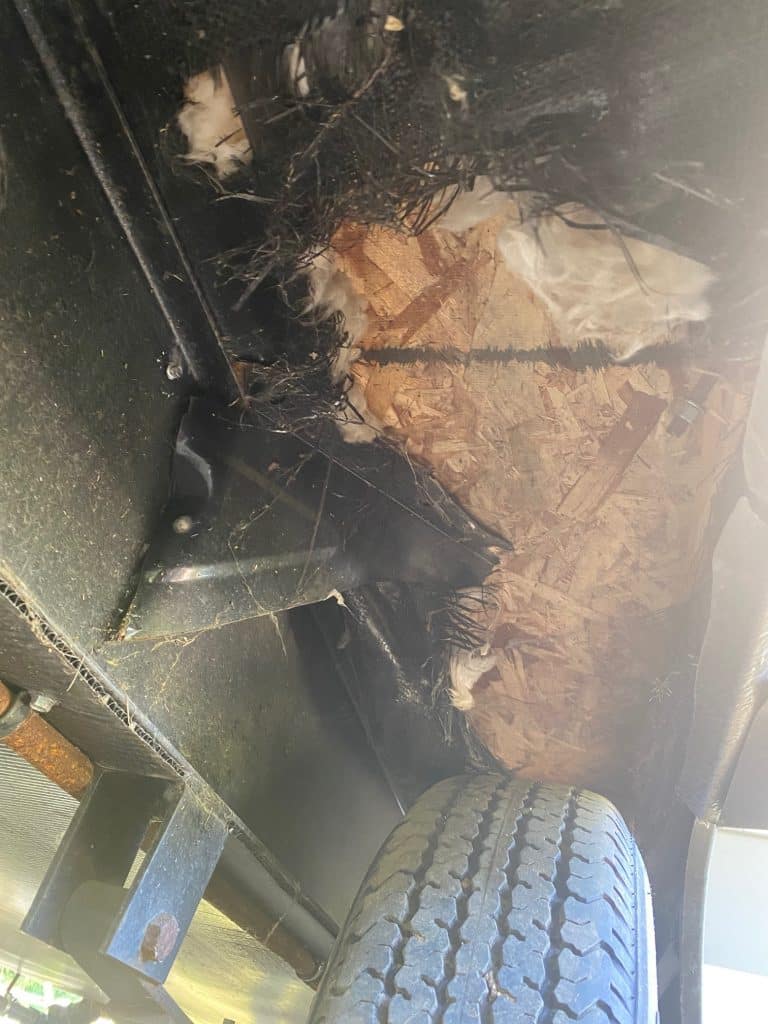
The most common reason for damage on a RV or Camper is a tire blowout. It happens to so many RV and campers and often takes the area above the the tire. It also usually ruins the wheel and sometimes gets even worst and takes out wiring, plumbing and I have even seen it rip up the siding of the RV or Camper. The quickest way to spot it is finding a mismatched wheel or tire. Then be sure to look above each tire and wheel area.
If the Bottom Looks Good Go Check the Roof

Your next step if everything on the outside of the walls, undercarriage, wheels and tires looks good then it is time to get that ladder out and check out the roof. Now if you are unsure of your abilities or not good with heights this is one of those times you should call an independent inspector to help you. No reason to risk, limb or life when you can simply hire an expert RV and Camper inspector to come do the whole thing for you, it’s just not worth the risk!
If you are able and willing to climb the ladder, know where to walk and where to avoid and know what to look for up top on the roof then be sure to take a look at the corners like the one above. You are looking for accumulation of water, debris and mildew but more importantly you need to push on that area and make sure EVERY SINGLE CORNER on the roof and where the vents, skylights and where items are mounted. NOTHING should feel soft or spongy and all sealant should be soft enough to push your fingernail in and there should be NO cracking or sealant pulling away from sealed areas.
Let’s Check Out the Battery and Electrical System
Now this is another one of those areas which you might consider hiring an expert RV or Camper Inspector. You will need a few special tools and know how to use them. It isn’t rocket science but just because you have the tools doesn’t always know you understand what they are telling you or the process in which to test something.
How to test the battery of a RV or Camper
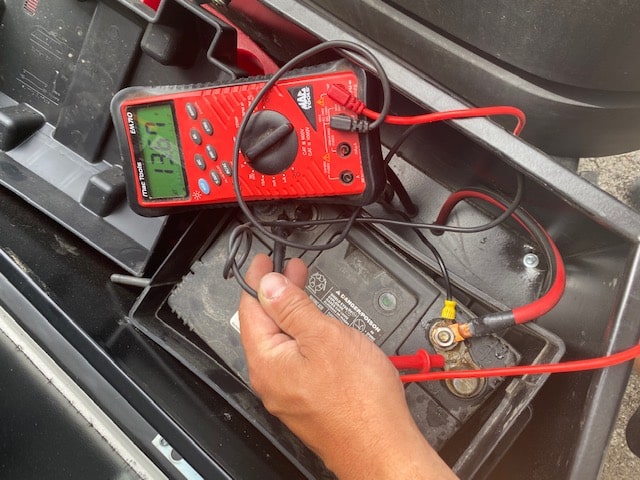
RVs and Campers have three separate electrical systems. Two of them are 12 volt systems or DC and the other is similar to the system in your house which is a 120 volt system or AC. Knowing how to test all three of these systems and how they work in connection with each other is crucial to inspecting your RV or Camper. Here are some hints.
- Test the battery with all lights and equipment turned OFF and the power disconnected from any power source. You will then need to use the DMM or voltmeter to see what the battery voltage is. You are looking for NOTHING less than 11 volts to show it is a good battery that needs charged, 12.5 volts to show a fully charged battery and a minimum of 10.5 volts. Anything less than 10.5 volts means the battery has been drained down too far, too many times and needs replaced. It is also a good indicator of how well the RV or Camper has been maintained in the past. This is often one of my very first items I inspect as it is will tell me a lot about the rest of the electrical system.
- Now if the battery shows decent voltage lets go turn on some lights inside as well as the refrigerator (on DC or gas power) as well as the radio or anything else that draws 12 volts. Basically anything that isn’t a big house-type appliance. Now go and retest the battery, you should see a substantial drop in volts and if you keep your DMM on the battery you should see a small drop in volts as the power is consumed. If you are not seeing a drop in power don’t be alarmed as long as everything is working.
- Now let’s plug in the RV or Camper to a power source such as power outlet (rated 30 or 50 AMPS that will match the camper) or a generator that will supply enough power for the entire unit. Retest the battery again, it should easily read over 13 volts. It might even read close to 14 as the converter is charging the battery and that is what we want to see!
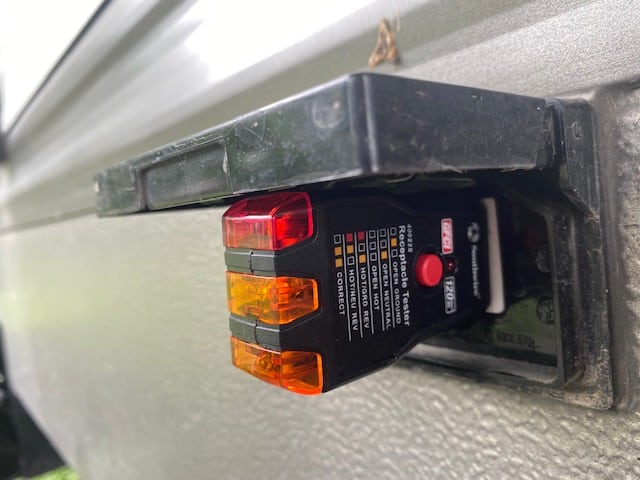
- In order to test the 120 AC system or house power, you will want to get you a receptacle tester. This is by far the easiest way to ensue that the main trunk system is wired properly and there are no main shorts. You simply plug it in like you would a lamp. Pointer here though is to have already used your device on a KNOWN GOOD circuit so you don’t get a false negative or have a learning experience while you are trying to test the RV or Camper. Most of these testers have a button to push to create a short and test the GFCI circuit of the 120 volt AC system. This should cause the system to trip the inside outlet (usually found in the kitchen or bathroom) if it is working properly. If it does NOT trip the circuit you have some electrical issues to address.
Testing Your RV or Camper Hot Water Heater
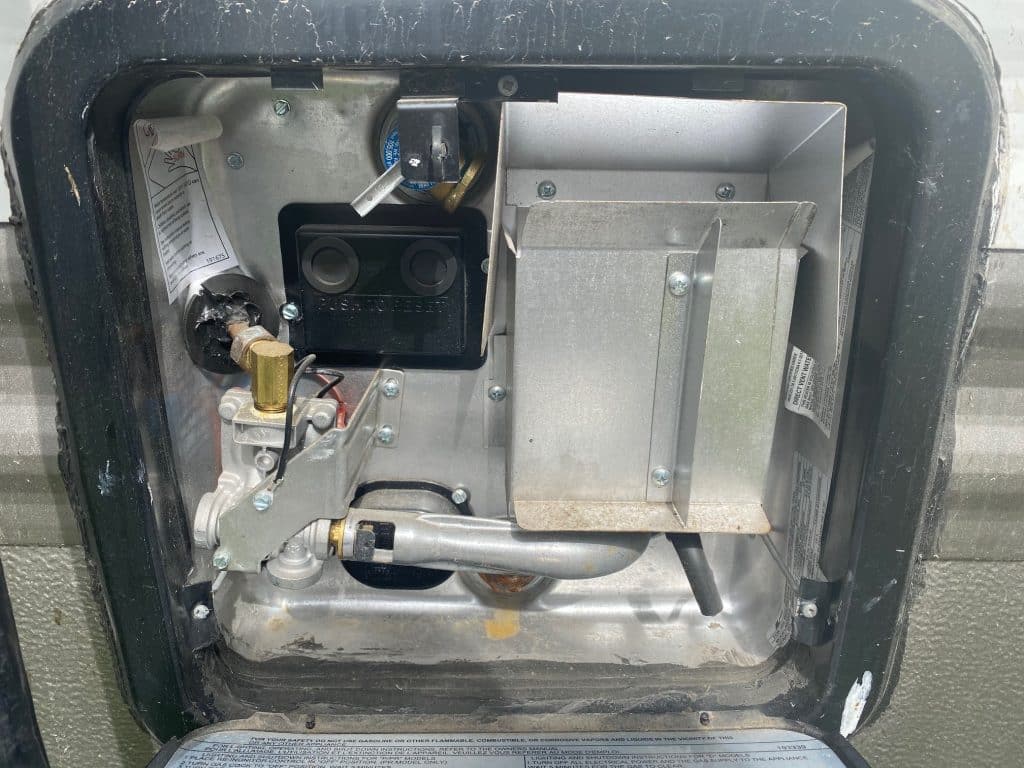
I like to start my RV and Camper water system and plumbing test at the hot water heater before the system is full of water. It just makes sense because you are going to be emptying out the hot water heater if you filled it up with water.
- Open the hot water heater access panel. They usually look the same, might be different color or slightly a different shape.
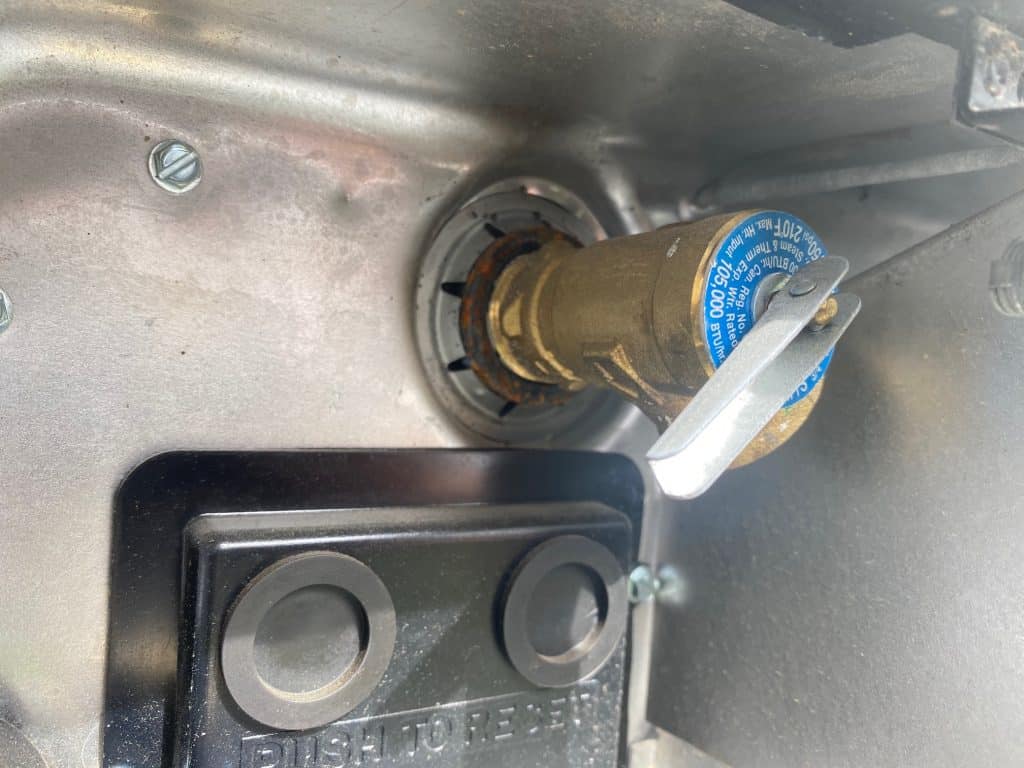
- Release any pressure that may be in the system, I do this two ways. I open a hot water faucet AND I open the pressure relief valve on the hot water heater. This is your safety, the last thing you want to happen is have water gush at you. Releasing the pressure on the system is the only way to be sure. Again, its not yours, so you don’t know.
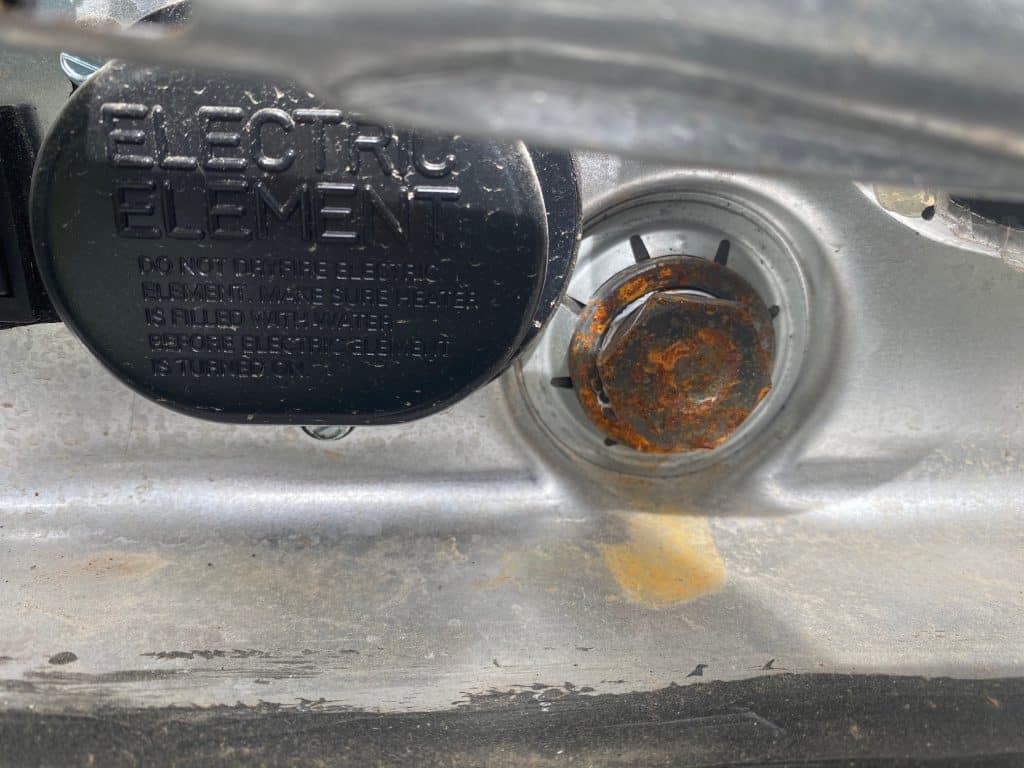
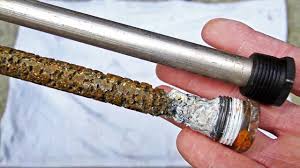
- I like to have the owner or seller remove the plug or anode rod from the hot water tank just in case the housing strips out or even breaks, you never know the condition of something unless it is yours already. Now some hot water heaters have anode rods and some do not depending on the internal designs. Those hot water heaters with Aluminum internal tanks such as Atwood hot water heaters do not have anode rods, but this also means that the internal tank can corrode. All Suburban brand hot water heaters have an anode rod. If the RV or Camper you are looking at has a Suburban hot water heater and you remove the bottom plug and no anode rod comes out with it, either pass on the camper or factor in having to replace the hot water heater.
- Do not be alarmed if you remove the anode rod and it looks like it just got drug down the road to hell and back. It is supposed to look like that. That means it did its job and saved the tank. It is recommended that the anode rod is replaced at least once a year.
- The rest of this test needs to be performed AFTER testing the water system.
- After the system has been filled turn on the gas and you will hear multiple clicks, this is the igniter attempting to light the burner. Sometimes it takes a bit if the LP system has been empty for some time, you may have to turn on the stove top for a few minutes. Once the system ignites, it will sound like a torch. Using a flashlight take a look inside where the burner is. You are looking for debris, rust and corrosion and cracks. You should see a little surface rust but nothing else inside there. There is no need to keep it turned on once it lights. Go ahead and shut it off.
- Now if your hot water heater is equipped with an electric rod or an internal element lets turn that on and wait for the water to get hot. It should get hot in about 30-60 minutes for a 5-6 gallon tank. There isn’t really anything fancy about checking the electric hot water system other than making sure it gets the water hot. If it does not get hot, then it may need reset which can be done by pressing the two black rubber buttons as seen above.
How to Tell If You Have a Weak or Leaking Water Pump When Buying a Used RV or Camper
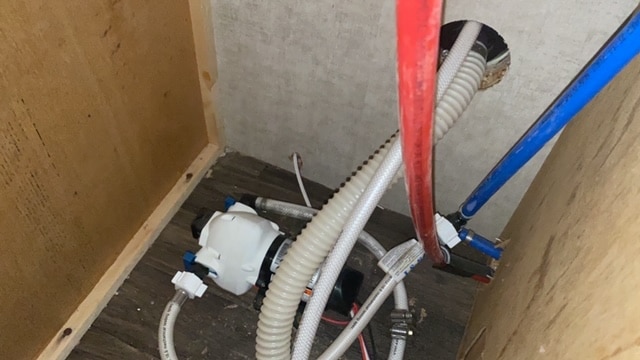
These days most RV and Campers are pretty well sealed up and it is tough to get to the lines in the belly of the camper when buying a used RV or Camper. These easiest way to test for leaks is to put water in the tank, I always do at least a 1/3 tank so I can see the gauge move, then open ALL the faucets to full OPEN positions and let the water flow until it no longer pushed air out, you might end up needing to add more water depending on how empty the lines were. Once you have full water coming out of the system and the hot water tank is full, close all the faucets. The pump may run for a minute or so to pressurize the lines but then should turn off. If the pump does not turn off you have one of two issues. 1. You still have air in the lines, people often miss the outside shower or sink. 2. You have a leak somewhere or the hot water tank does not have the plug in it. Once the lines are pressurized and the pump turns off it should NOT kick in as long as there all faucets are closed. If the pump cycles after a few minutes you have a leak somewhere and the system is loosing pressure.
Now the other way to do this test is to hook up the RV or Camper to the city water connection and do the same thing except you will have to physically check for leaks at all the connections throughout the entire RV or Camper. I perform both task but I do the pump test first. If the pump test fails then I do the city water test. Before connecting to city water BE SURE TO USE A REGULATOR or you will blow seals and lines. Your RV or Camper is only rated up to 40 – 60 PSI of water pressure. Lines from your house or many outside spigots can provide well over 100 PSI and cause a lot of damage.
There are several different types and manufactures of hot water heaters in RV and Campers. They all work on the same principle. You either have a dual gas / electric hot water heater or just a gas hot water heater. I will walk you through checking both types.
If all of this sounds a bit technical or difficult it may be time to call in the pro. I go through the entire used RV or Camper literally from top to bottom and inside and out. I test every system, check every connection I can and use the camper as if I was going to camp in it. This includes running the slides out and in and back out, testing the jack and leveling system, testing the appliances, AC, heater, microwave and much more. Send me a message or give me a call and we can set it up.
I am happy to assist you with a used RV or Camper Pre-Purchase Inspection. My fee for a camper inspection in St Louis starts at $300 if the seller has power and water onsite. I can bring the needed water, pump, generator and extension if needed. You are ready to schedule your RV or Camper inspection head on over to the ordering page and I will get it started for you.